Frequently Asked Questions
Find answers about our platform features and organization settings.
Once you've finished setting up your auction, you can begin adding auction items. Click on the auction items tab within the drop down on the left side of the page. This will take you to a page that will eventually list all your auction items and their statistics. To begin, click add new item in the upper right corner. This will take you to the item creation page. Here, you can either enter your own items that you would like to be auctioned off, or you can choose to add items from our item finder. For the items you are adding to the auction yourself, you can add the item name, description, and images. Each item will also have the option to have its own specific date and time range. You can keep this the same as the auction, but you have the option to have specific items end at different times.
Additionally, each item will have required fields such as the value of the ticket, cost per ticket, closing time, limit per person, and closing date. Finally, you will need to add contact information and pick-up information for each item. This will be displayed on the screen of the auction item winner after they receive a congratulations screen. Click Save Item when you are done.
Navigate to the 'My Auctions' tab. Find the Auction you'd like to edit and click on the 'Edit' button.
Visit the Auction Items tab of your completed auction. The 'Winners' column will notate the auction item winners, who are also emailed notating they won an item.
In order for a participant to bid in an auction, they'll have to enter their contact information. After an auction has concluded, these details can be found within the Auction Items tab of a completed auction.
When setting up your auction, you are asked to process payments automatically or manually. If you selected automatically, then the credit card will get charged once the auction is over. If you selected manually, then you will have the option to charge them whenever you see fit.
We don’t currently offer the option to charge an additional fee to your participants for shipping. You will have to arrange that on a case-to-case basis with your participants. We recommend asking participants to pick up their items at your main office if they cannot actually attend the auction.
Navigate to My Auctions. Click 'Edit' on the auction you would like to adjust the end date for. You can adjust the date under 'Auction Details'.
Yes! When you add an auction item, you have control over variations with auction item end times.
No, items have to be uploaded individually.
Whether you are adding or editing an auction item, click on the 'Upload' button on the right-hand side of the respective auction item page.
No, your supporters will need to let you know about something they’d like to donate to the auction, and then give the item to you. No one else will have access to edit your auction.
Truthfully, the app is much easier to manage. If your supporters have the capability, download our free auction app from the app store.
If this is not an option, no worries! Follow this link below. They will be able to select your auction, and proceed here.
To customize this product you can create a theme. “Organization Themes” within your settings dashboard allows you to select colors, fonts, images, and more to make the products reflect your branding and voice for supporters. Simply select the PWI Product you would like to associate with that theme and select the theme name when creating your auction. You can have multiple themes for each product to fit seasonal or event-specific branding.
Use the direct link below or go through your Dashboard to “Organization Dashboard/Settings”, select the “Settings” tab, and go to “Organization Themes” in the left side navigation.
https://projectworldimpact.com/dashboard/org-settings/settings
You can edit a campaign at any time by clicking on the campaign in your dashboard and selecting Edit. Changes to titles, descriptions, and images take effect immediately. Note that some changes (like reducing the goal below the amount already raised) may have restrictions.
Campaigns can be: Active (accepting donations), Pending (awaiting approval or start date), Inactive (paused but not ended), or Expired (past the end date). You can change the status at any time from the campaign settings.
To feature a campaign, edit the campaign and enable the Featured option. Featured campaigns appear prominently on your public crowdfund page and can be filtered in the embed widget.
Yes, end dates are optional. If you don't set an end date, the campaign will continue to accept donations until you manually change its status.
Crowdfund is a powerful fundraising tool that allows your organization to create and manage crowdfunding campaigns. You can set funding goals, offer incentives to donors, track progress, and share campaigns on your website or social media.
To create a campaign, go to the Crowdfund dashboard and click New Campaign. Fill in the campaign details including name, description, funding goal, and dates. You can also add images, incentives, and sponsors to make your campaign more engaging.
Yes! You can run as many campaigns simultaneously as you need. Each campaign has its own dedicated page, progress tracking, and donation management.
To add incentives, navigate to the specific campaign, click on Incentives, and then click Create. Fill in the incentive details such as name, description, and required donation amount. Save the incentive to make it available to donors.
Yes, you can edit or remove an incentive by going to the Incentives section of your campaign. Click on the incentive you wish to edit or remove, then select Edit or Delete as needed.
To add sponsors, go to the campaign's Sponsors section and click Create. Enter the sponsor's details, including name and logo. Save the sponsor to associate them with your campaign.
Yes, you can edit or remove a sponsor by accessing the Sponsors section of your campaign. Select the sponsor you want to modify and choose Edit or Delete accordingly.
To generate a report, go to the Reports section of your dashboard. Select the campaign for which you want to generate a report and choose the type of report you need. Click Generate to view the report.
Yes, you can export campaign data by navigating to the Export section. Choose the data you wish to export, such as donations or donor details, and select the format for export. Click Export to download the data.
We provide a wide range of services surrounding marketing, development, design and more! More information can be found here: https://nonprofit.projectworldimpact.com/
Contact us with questions or submit the project discovery form to get started. PWI Pro Plan members are eligible for discounts.
No. Our PRO plan offers a variety of tools that will help with your fundraising and overall visibility. You can learn about all we offer in the PRO plan by choosing the "What is included in the 'Pro' plan?" FAQ in the Membership Plans section.
We do offer marketing services to PRO plan members for an additional cost. Information on our marketing services are listed here: https://nonprofit.projectworldimpact.com/
We will confirm your page and send a request. We request page access to your account as an Admin and all we need is for you to accept the invitation. Since we will be working on your account behind the scenes we will need full access as an admin to post on your behalf.
We will need access to both your page and Ad Account. For your Ad Account we need the ID number to request access.
Adding a payment method to your ad account is very easy. This is important, since our team will need this to be set up before we can run ads for your account.
Check out this link for steps on adding your billing information to your Meta Ads account.
If you need any help, click on the Help button in the lower right-hand corner.
Meta Pixel is a small snippet of code that you place on your website to collect data. When this is added to your website you can track conversions from Meta ads, optimize these ads, build out a targeted audience for future ads, and remarket to people who have already taken some kind of action on your website.
One great example of Meta Pixels' remarketing capability is if you are browsing for a product on a website and add it to your cart. Meta Pixel will place and trigger cookies to track users as they interact with your business both on and off Facebook and Instagram so with the product added to your cart, ads will pop up redirecting you to complete the purchase (ads or 'sponsored posts' can also have discounts noted).
Meta Pixel ads allow you to reach your desired audience with a higher chance of quality conversions. The data collected allows you to see people interacting with your website, and you can track their actions across multiple devices. Remarketing to these individuals is easier when Meta Pixel is installed.
A boosted post is directed to people who like or follow your page.
A Sponsored post is basically an ad and you can target a wider audience by choosing specific demographic focuses such as age, location, interests, behaviors, etc. We recommend Sponsored posts to reach more people who may have an interest in your content.
- Navigate to the Events section of the dashboard.
- Click on the Create Event button.
- Fill in the necessary details such as event name, date, and location.
- Click Save to store the event details.
- Go to the Events section and find the event you want to edit.
- Click on the Edit button next to the event.
- Update the event details as needed.
- Click Save to apply the changes.
When you delete an event, it will be permanently removed from the system, including all associated registrations and ticket sales. Ensure you have backed up any necessary information before proceeding.
- Select the event from the Events section.
- Click on the Registrations tab to view all participant registrations.
- Go to the Registrations section of the event.
- Click on Create Registration.
- Enter the participant's details and click Save.
- In the Registrations section, find the registration you want to edit.
- Click Edit next to the registration.
- Update the participant's details and click Save.
- Navigate to the Categories section under Events.
- Click on the Create Category button.
- Enter the category name and description.
- Click Save to add the category.
- Go to the Categories section.
- Find the category you wish to edit and click Edit.
- Make the necessary changes to the category details.
- Click Save to update the category.
- In the Categories section, locate the category you want to delete.
- Click on the Delete button next to the category.
- Confirm the deletion to remove the category permanently.
- Select the event you want to add tickets to from the Events section.
- Go to the Tickets tab under the selected event.
- Click on Add Ticket and enter the ticket details.
- Click Save to create the ticket type.
- Navigate to the Tickets section of the event.
- Find the ticket type you wish to update and click Edit.
- Modify the ticket details as required.
- Click Save to apply the changes.
- In the Tickets section, locate the ticket type you want to delete.
- Click on the Delete button next to the ticket type.
- Confirm the deletion to remove the ticket type.
- Select the event from the Events section.
- Navigate to the Coupons tab.
- Click on Create Coupon and fill in the coupon details.
- Click Save to add the coupon.
- Go to the Coupons section of the event.
- Find the coupon you wish to update and click Edit.
- Modify the coupon details and click Save.
- In the Coupons section, locate the coupon you want to delete.
- Click on the Delete button next to the coupon.
- Confirm the deletion to remove the coupon.
To access the Form Builder dashboard, navigate to the /dashboard/formbuilder URL. Ensure you are logged in and have the necessary permissions to view this section.
- Go to the Form Builder dashboard.
- Click on Create to start a new form from scratch, or Create with AI to use AI assistance.
- Follow the prompts to add fields and customize your form.
- Once satisfied, click Save to store your form.
The AI form creation feature allows you to generate a form using AI assistance. Simply click on Create with AI and follow the instructions to let AI help you build a form based on your needs.
To view form submissions, navigate to the Submissions section of the Form Builder dashboard. Here you can see all submissions for each form.
Yes, you can export form submissions. Go to the Submissions section, select the form, and click on Export to download the submissions in your preferred format.
- Navigate to the Form Builder dashboard.
- Locate the form you wish to edit and click on it.
- Click on the Edit button to modify the form.
- Make your changes and click Save to update the form.
Yes, you can duplicate a form. Go to the form you want to duplicate and click on the Duplicate button. This will create a copy of the form that you can modify as needed.
- Access the form you wish to publish or unpublish.
- Click on Publish to make the form live, or Unpublish to take it offline.
- Confirm your action to complete the process.
To get the embed code for a form, go to the form's settings and click on Embed. Copy the code provided to embed the form on your website or other platforms.
- Open the form you want to modify.
- Navigate to the Fields section.
- Click on Add Field and select the type of field you wish to add.
- Configure the field settings and click Save to add it to the form.
Yes, you can reorder fields. Go to the Fields section of your form and use the drag-and-drop interface to rearrange the fields as desired. Click Save to apply the changes.
- Access the form and go to the Fields section.
- Find the field you wish to delete.
- Click on the Delete button next to the field.
- Confirm the deletion to remove the field from the form.
The Google Ad Grants Program gives nonprofits the chance to advertise on Google Ads at no cost to themselves. This program gives qualified organizations up to $10,000 per month to spend on Google Ads to promote their missions and initiatives on Google. To qualify, nonprofits must go through the application process. To keep the grant, nonprofits must follow the compliance details and maintain their status.
PWI is a Certified Google Partner and has a team dedicated to managing nonprofits' Google Ad Grant accounts. Nonprofits can receive Google Ad Grant acquisition and management through a partnership with PWI. Learn More Here.
To be eligible for Google Grants, an organization must:
- Hold current and valid charity status (for example, in the US you must have a current 501(c)(3) status)
- Acknowledge and agree to Google Grant’s required certifications regarding how to receive and use donations obtained from the grant (we will go into more detail)
- Have a website that is both functioning and provides adequate detail on your nonprofit
The following organizations are not eligible for Google Grants:
- Governmental entities and organizations
- Hospitals and medical groups
- Schools, childcare centers, academic institutions and universities (philanthropic arms of educational organizations are eligible)
Please note, Google does have a similar program for educational institutions (http://www.google.com/edu/).
PWI has a team dedicated to helping nonprofits with their Google Ad Grant acquisition and management through one of our marketing services. Reach out via the Help button to learn more and get started today!
While the Google Ad Grant is a fantastic opportunity for nonprofit organizations, there are a number of eligibility requirements outlined by Google that need to be met. The application for the Google Ad Grant starts with a Google for Nonprofits account.
To be eligible, an organization must:
- Be registered as a charitable organization in one of the countries listed via the link below. All organizations must be verified by Goodstack, Google's validation partner.
- Meet the requirements in its own country. Sometimes countries have additional eligibility requirements. Find your country in the list below to review the additional requirements.
- Agree to the Google for Nonprofits Terms.
Note: If you don't see your country listed here, Google for Nonprofits hasn't been launched in your country yet.
You are not eligible for Google for Nonprofits if your organization is:
- A governmental entity or organization.
- A hospital or health care organization (charitable arms or foundations associated with healthcare organizations are eligible).
- A school, academic institution, or university (philanthropic arms of educational organizations are eligible). Learn more about Google for Education, Google's programs for educational institutions.
Additionally, you must have a high-quality website that meets Google's website policy, and you must be able to meet Google's program policies.
If you meet all of the prerequisites outlined by Google, your organization is eligible for the Ad Grant. If Google deems you ineligible, they will outline the conditions that have not been met. Should this occur, you are not permanently denied and can reapply and become approved at any time by making the necessary adjustments in accordance with their requirements.
We hope you look into applying for the Google Ad Grant as it truly is a fantastic resource! If potential anxiety around a possible denial of your application causes you to think twice before submitting your application, we highly recommend you apply anyway, as you have nothing to lose and this is an incredible potential marketing opportunity!
Also, as a Google certified partner, we would be happy to assist you! PWI marketing solutions centered around application support and management of both the process and the grant. If interested, click on the Help button below, or click here to signup.
Any nonprofit who is signed on for the Google Ad Grant Management or our Pro plan may give us access to their Google for Nonprofits account. This is only needed so that we can apply for the Google Ad Grant on your behalf or are recovering an existing account. If you already have access to a Google Ad Grant account, no need to give us access. Outlined below are the steps to give us access to your Google for Nonprofits account.
1. Log in to https://www.google.com/nonprofits/
2. Click Manage Administrators
3. Click Add Administrator
4. Add the name PWI and use the email nonprofit@projectworldimpact.com
5. Click Add.
That is all. Feel free to email our Nonprofit Success Team at nonprofit@projectworldimpact.com if you have any additional questions.
When accepted, your organization will receive $10,000 a month in your Google Ads account. This is a credit/ monthly allowance. You should not expect to receive a check or bank deposit of $10,000 to your nonprofit.
PWI is a Certified Google Partner and has a team dedicated to applying and managing nonprofits' Google Ad Grant accounts.
Visit our Ad Grant services page at https://projectworldimpact.com/dashboard/google-grant/get-started to learn more.
To apply for the Google Ad Grant, you must complete the following steps.
- Before you apply, make sure your nonprofit is based in a country where the Google Ad Grant is available, and that you comply with the other eligibility requirements.
-
Assuming you’re eligible, you’ll need to apply for a Google for Nonprofits account. To do this, you'll need:
-
-
-
- A Gmail account (new or current)
- EIN number
- Your official name (the one in your determination letter; if you’ve experienced a name change, please also provide this documentation)
- Your organization's address
- Type of impact (you'll fill this out in the application)
- 501c3 determination letter or similar document from the IRS/Department of Treasury (for Percent to verify your identity)
- Cannot be a state-level document nor a document downloaded from an online database such as the IRS or GuideStar.
-
-
-
3. Once your Google for Nonprofits account is approved, submit the pre-qualification form found in the Ad Grants enrollment guide.
4. After your pre-qualification form has been approved, you can move to part 2 of the application process. Included is a guide on how to link your Google Ads account and set up a few Ad Campaigns to be tested.
5. Once you submit part 2 of the google ad grant application and it is approved, you are all set with the Google Ad Grant. From here, you can manage your ads on your Google Ads account.
If you are a Pro Plan member, check out the FAQ entitled: 'I just signed up for Google Ad Grants Management Services, how do I get started?' for a specific look at the help we offer regarding the application and management of the grant.
If you have questions along the way, feel free to click on the Help button in the lower right-hand corner.
If you are attempting to acquire and manage the Google ad grant in-house, simply refer to our application FAQ for guidance. Google and/or Google's validator will walk you through the process up to ad creation.
If you are utilizing PWI's ad grant management services, our team will help you handle your grant from application to execution. As a Google Certified Partner, PWI will apply for the grant on behalf of your nonprofit. Once you’re approved, we transition ownership of your grant account and link our managing account, which allows us to execute management from there.
Organizations that meet the Eligibility Guidelines can apply for the grant for free on their Google for Nonprofits account. Once the grant is received, an organization has access to $10,000 worth of ads every month, as long as they are able to maintain the compliance standards for Google Ad Grant Accounts. The ads serve on Google's search bar, and the money is used to bid on user searches to serve your ads.
The Google Ad Grant is an incredible opportunity for nonprofits to improve awareness of their cause and take their online presence to the next level. With 3.5 billion Google searches per day, the opportunities to be seen by a new online audience are endless. Large for-profit companies end up paying a fortune to be featured on Google, but with the Google Ad Grant nonprofit organizations have the opportunity to appear near the top of a Google search for FREE.
In Google Ads, both a paid ads account and an ad grant account look very similar (you can have both). Currently, there are only two ways to differentiate between your accounts: through account creation/setup, or in the billing summary in your Google Ads account.
For a paid ads account, account creation is quite easy. All you essentially need to do is head to Google Ads and sign in or create an account using a Gmail email address.
Ad Grant accounts, however, go through a lengthy application process. It starts with the creation of a Google for Nonprofits account. This account is used to activate the ad grant, which can be started under the products tab. When an ad grant activation request is approved on a Google for Nonprofits account, the Customer ID# (10 digit Google Ads account number) will appear in the same product box the activation request was submitted through. When signing on to Google Ads, if the CID# of the account you have in front of you aligns with the CID# found in your Google for Nonprofits, the account you have in front of you is your ad grant account.
The other means for differentiating is through the billing section that can be found through signing into your Google Ads account. To find the billing section, select 'Tools & Settings' at the top of the account, and click on 'Summary' under Billing. Once in the billing section, a paid ads account will list payment setup or a debit/credit card, which is required in order for payments to be processed. In contrast, an ad grant account will say 'This payments account is not billed', since the grant is free to use.
This is important to check as it will ensure you are utilizing the proper account and avoiding any charges for paid ads. If PWI is managing your grant, please provide us with the proper account CID#. If you have any questions or need further clarity, click on the Help button below.
Yes, we do! We offer a full refund to organizations whom are deemed ineligible for the Google Ad Grant.
We do not offer a refund for extenuating circumstances until we have exhausted all efforts. Extenuating circumstances include (but are not limited to) the discovery of a prior Google for Nonprofits account, denied application due to the improper format of a 501c3 letter, and/or reactivation requirements for a suspended/deactivated account. Google allows for only one Google for Nonprofits account and one Google Ads grant account per organization, so PWI will work with you through any unique circumstances.
For PWI's Google Ad Grant management, our standard rate is $350/mo or $3500 for a year commitment ($333.33/mo annually). To get started sign up here.
Although the Google Ad Grant is an amazing tool for many nonprofits, there are a few limitations compared to a paid account that can be found here: Google Ad Grants Policy Compliance Guide
Thankfully we consistently find that Ad Grant accounts are often incredibly successful despite having fewer capabilities compared to a paid account.
In order to keep your Google Ad Grant, you must maintain and meet Google's metrics for active management. PWI would be happy to help you manage your Google Ad Grant. Learn more info here.
No, you can absolutely manage the Google Ad Grant on your own. The Google Ad Grant is a completely free, from acquisition to management. However, we know that many nonprofits don’t have the capacity or the expertise to create and manage a Google Ads account. This is where PWI can help.
Project World Impact was one of the first 10 Google Certified Professionals in the Google Ad Grant program. We have had the pleasure of helping more nonprofits with their Google Ad Grant than any other company around the globe. Nonprofits we work with are able to stay up-to-date with their ad success by viewing our real-time data studio report. At only $350/month and with no long term commitment requirement, we are the most cost-effective Google Certified partner available.
If you would like to learn more or have any questions, click the Help button in the lower right-hand corner.
Google has selected Project World Impact as a part of their Google Ad Grant Certified Professionals Community. PWI is one of 45 agencies selected to be apart of an elite group that has both Ad Grants experience and nonprofit sector specialization.
- We were given approval as one of the first 10 organizations named a Google-Certified Professional
- We have experience with managing hundreds of ad grant accounts
- PWI has no hidden fees, nor binding contracts
- PWI has a nonprofit focus and mission to help all nonprofits succeed; we also have our own nonprofit, the PWI Foundation
- Application Support, Account Recovery, and/or Reactivation of a Canceled/Suspended Account
- Continuous Ad Creation and Optimization
- Data-Driven Growth – Track results, optimize campaigns, and improve conversion rates with easy to understand, impactful reporting that isn’t a hassle
- AI Videos guiding nonprofits through their partnership with PWI
- Expert Management – Our certified Google Ad Grant experts manage your campaigns with precision and care, ensuring every ad reaches the right audience. We respond quickly to your needs and optimize campaigns, so your nonprofit can maximize impact without delays.
- Complete Timeline of what to expect from each phase of PWI Google Ad Grant Management to help you understand what we will be doing to maximize your account
- Strategy Meetings
Interested in signing up for PWI Google Ad Grant Management? Go to www.pwi.app/grant for our month-to-month plan, or view our year-long Basic plan at https://projectworldimpact.com/pricing
Our Google Ad Grant management services are $350/mo or $3500 for a year commitment ($333.33/mo annually). To get started, sign up here.
The Google Ad Grant application process requires specific information from your organization in order to be approved for Google for Nonprofits. Once you are approved for Google for Nonprofits, Project World Impact is happy to assist you in applying for and managing your Google Ad Grant, and we have a few different payment options.
The list below outlines all the information required to apply for a Google for Nonprofits account.
For anyone who has not yet signed up to receive Google Ad Grant Management services with PWI, we would love to schedule a meeting with you to discuss more! Learn more at https://projectworldimpact.com/dashboard/google-grant/get-started.
Google for Nonprofits Information
EIN
Official Organization Name
Official Organization Address
Website URL
501c3 Letter
We're excited to partner with you on the Google Ad Grant. To signup for these services, please click here.
Welcome! We are so glad to be working with you! In order to manage your Google Ad Grant, we will need to have access to both your Google Ads account and your Google Analytics account (if applicable). The steps listed below are for nonprofits who have already applied and received access to the Google Ad Grant.
If are paying for our Google Ad Grant Management Service and have not yet applied for the Grant, our team will apply for you. Click here to view needed application information, or reach out to our Nonprofit Success Team by clicking 'Help' below.
If you were previously approved for the Google Ad grant, please follow the steps below to give us access.
- Go to your Google for Nonprofits account and find the 10 digit CID number displayed under the Google Ad Grants tab. Copy and paste this CID number and email to nonprofit@projectworldimpact.com.
- A Nonprofit Success Team member will request access in Google Ads, and you will receive an email to confirm access. Press "accept" to give PWI access, this will need to be clicked on twice. From the email, you will be redirected to another page and approve access.
- Next, PWI needs access to your Google Analytics account. PWI will not manage your Google Analytics, however we use it to support the ad grant.
- If you have a Google Analytics account already created, you can add PWI by going to the bottom left corner settings icon> Account User Management > Add User > add email nonprofit@projectworldimpact.com. Visit our Google Analytics FAQ for a more in depth look at this process.
- If you do not have a Google Analytics account, go to your Google for Nonprofit account. Scrolling down below the Google Ad Grant application, there is a button to learn more about Google Analytics. Click “Learn More” and then “Activate”. Once activated, follow steps 3 and 4 to give PWI Management access to your Google Analytics account.
Once we have access to your Google Ads and Google Analytics accounts, you are good to go! Our team will take over from here, however we will eventually reach out on Google Tag Manager as well. Check out your Google Ad Grant Dashboard for analytics on your Ad success.
You'll first need to determine if you have an activated ad grant or not. This can be best confirmed on your Google for Nonprofits product page.
Step 1: Finding Your Customer ID#
Log-on to Google for Nonprofits using an admin email address associated with your organization's account. Once signed in, you should be on the products page of your account. The second Google for Nonprofits product, titled Google Ad Grants, will note your ad grant's status. If your grant status says approved, it will list a 10-digit Customer ID# unique to your ad grant account. Please email this to nonprofit@projectworldimpact.com. Once your CID# has been relayed to PWI, proceed to Step 2. If there is no Customer ID# listed, proceed to Step 3 instead.
Step 2: Granting PWI Access
Once your Customer ID# has been relayed to PWI, we will extend a request for access from our managing account within 24 business hours. This request can be accepted two different ways:
- An email from Google will be sent to the ad grant account admins, containing a request for access from PWI and outlining steps that need to be accepted (*there are two buttons that need to be accepted)
- Via Google Ads directly; log-on using an admin email address associated with your organization's grant account, and make sure the account number listed is the same as the account number on your Google for Nonprofits product page. Click on 'Tools & Settings' --> Select 'Access and security' under Setup --> Click on the 'Managers' tab in the upper left hand corner --> Accept
Step 3: Granting PWI Access to Google for Nonprofits
If you do not yet have an activated ad grant, PWI will take care of this for you. In order for us to submit the grant activation form, we will first need temporary access to your organization's Google for Nonprofits account.
In the Google for Nonprofits navigation bar under your organization's name, click on the 'Administrators' tab.
Click on the blue 'Add administrator' button. Add nonprofit@projectworldimpact.com, Name: PWI, as a temporary administrator. Once we've activated your grant, our administrative access will be removed.
If you have any difficulties in achieving these steps, please click on the Help button below.
Performance varies widely for each nonprofit. Results are influenced by several factors, including your geographic target area, the scope of your advertising objectives, search competition, the health of your keyword landscape, and more. Because Google Ads is driven by live search behavior, performance will naturally fluctuate day to day and month to month.
Our team performs recurring optimizations to strengthen your account over time, but it’s important to understand that no two organizations will see the same metrics.
That said, we will do everything we can to drive strong, meaningful results for your account within Google’s policies and the opportunities available in your search space. And as a Google Certified agency, we are equipped to do so.
PWI will assist with the application and handle management of your Google Ad Grant. Upon signing up with PWI, your organization will simply need to give us access to a previously-created Google Ad Grant account, or give PWI access to your Google for Nonprofits account so we can apply for the grant on your behalf. If you have neither of these, we will need a copy of your 501c3 determination letter.
From there, we'd like to leverage Google Analytics 4 and Google Tag Manager to help us maximize your grant. Our team will determine whether you do or do not have these accounts, and send relevant instructions from there. We may need your assistance with access or code integration.
The Google Ad Grant does not expire as long as the program is available. The Google Ad Grants program has been running since 2003. Although periodically changes are made to their terms and conditions, we are confident that you will be able to receive this benefit as long as you can meet Google's minimum necessary requirements.
Both are great opportunities to increase your visibility! Our marketing team would be happy to speak with you in regard to any needs you may have with management of your Facebook or Instagram Ads. In general, we have found that Google Ads are more successful in increasing website traffic with people searching for specific terms online. Facebook ads are shown to users on Facebook, and Instagram ads are connected since they both connect under Meta, whereas Google ads can be shown to people as they browse the internet from google.com, chrome, and other display network websites.
Yes, after the Ad Grant has been approved, you can apply for additional sites through an additional domain request form from Google. They should be approved as long as they meet Google's specifications notated in the website policy.
The PWI team will be reviewing your grant daily, so there is no need for additional meetings. We offer a Help button option if you need to get a hold of our Nonprofit Coordinator team. Feel free to let them know updates as it relates to your website or grant account.
If you are interested in additional meetings, we offer $100 meetings with our Ad Grants Team as frequently as you want. We encourage nonprofits to follow our standard communication system prior to considering paying extra. We know budgets are often tight for nonprofit organizations, and we find that our standard online communication line is all that is necessary to manage a successful Google Ad Grant Account.
Click HERE to sign up for a Premium Support meeting or log into your PWI account.
If you are signed on for any of $350/month, $500/month, or $750/month Google Ad Grant plans you can book a monthly meeting with a Google Ad Expert from the Premium Support Tab on your Google Ad Grant Dashboard. You will be credited every month and there will be text in the blue banner you can click on that says 'Schedule your meeting now.'
Absolutely! Please keep in mind that the ads we create are based on the unique content from your website and are exclusive to your nonprofit. We've worked with hundreds of nonprofits across many different categories from animal organizations to adoption centers, faith-based organizations, mental health advocates, and education enrichment organizations. Here are examples of mobile and desktop ads for two nonprofits we've run successfully:
The Google Ad Grant is created to help drive traffic to your website. We can guarantee you will have added website traffic, but it is hard to say for certain that you will find increased donations or revenue. If goal tracking and e-commerce tracking are set up correctly, we can help optimize your campaign to encourage people to donate and purchase on the site. Keep in mind that it would not be typical that the first time someone hears about your organization that they will donate. This is why we also focus on conversion rates of non-monetary calls to action. Although we can’t guarantee additional funding from the grant, it is common to see revenue increase as your organization's awareness increases with the grant.
A CTA (call to action) is an actionable prompt your website guides a visitor to complete. Some examples of CTAs include: "Click Here" "Learn more" and "Donate". Every webpage should have a clickable step or button for web users to interact. Websites tend to have higher bounce rates when there are unclear CTAS or if there are no CTA buttons at all. When thinking about adding CTAs, consider the list below.
- What is the main purpose of this webpage?
- It's important to be intentional with each of your web pages. Decide what you want a user to ideally do when browsing this page. Whether it be clicking a button to explore an additional webpage, filling out an interest form, donating, or much more.
- Is your web page's purpose clear?
- After you decide on each of your web pages CTAs, make sure that this purpose is clear. Read through the text surrounding the call to action button, and consider the user experience. Does the CTA match the rest of the web page content? Take time to consider the webpage content when making changes to your CTAs.
- Is your CTA button easy to find?
- In order for users to interact with your CTAs, they need to be easy to find. We suggest placing your most important call to action in the upper right corner of your home page. Other CTAs can go above or below the text that describes the call to action. Be careful not to add CTAs below the very lengthy text. Make sure the font and color of your CTA button are easy to read.
If you are looking for additional information on CTAs, check out an article written by Google's team by clicking HERE.
The page users are driven to after clicking on your ad, commonly referred to as the landing page, will have a large impact on your ad's performance and its ability to generate impressions, clicks, and conversions. Users anticipate coming to a cleanly designed page that is easy to interact with, has clear call-to-actions and perhaps most importantly accurately lines up with the wordage they are searching for. Below are a few tips and tricks that will help maximize your Google Ads account, in relation to your web content.
How Much Text?
Google Ads are text based. A good rule of thumb for Google Ads is more text is better to go off of than less text. This is of course important to take into consideration in combination with the general user experience, as organically, for a positive user experience, it's preferred to have content that is short and direct. We recommend finding the middle ground between the two, or consider utilizing more content rich hidden pages that will not inhibit the organic user experience.
Keyword Consistency
Keywords are words or phrases that users search for, and correlate to a product, service, or theme provided by your organization. At a high level, keyword consistency means having the keywords or sets of keywords that you want to rank for in searches spread over all the elements of a particular web page. While it begins with utilizing a specific keyword in Google Ads, users statistically will engage with an ad and content more if said keyword is being utilized in both the ad itself as well as being clearly visible on a landing page.
When building ads, we will explore the plain text on a landing page for these keywords as they will be scored higher with Google. Higher scoring keywords often correlates to more efficient ads, better results, and a higher engagement rate. While we will explore variations to keywords especially those that are actively searched for quite a bit if applicable to a landing page, even variations will perform more efficiently if they are mentioned in some capacity on a landing page.
Keyword Planner
You may be wondering how do I find the best keywords or what are the best keywords? Google has an excellent tool called the Keyword Planner for this. While accuracy and mission alignment are important to take into consideration, it may be in your account's best interest to utilize keywords that are actively searched for more than alternatives that are not. We may be targeting these keywords already in Google Ads, but to maximize the results, it is also important to add these keywords to your website text.
Google Ads are text-based. It can be difficult to accomodate video content in Google Ads. Videos, however, can be very text rich and may provide a plethora of keywords and wordage we can use for the ads. Included below are guides on how to transcribe videos for two of the most common video platforms, Youtube and Vimeo.
Given Youtube is affiliated with Google, a pro to utilizing Youtube is that you do not need to actually integrate the text on your landing page. Google Ads are able to pick up on Youtube transcriptions, as long as the video is transcribed.
While Vimeo is also a fantastic video platform, Vimeo transcription text is required to be integrated as plain text on a landing page in order for it to be leveraged in Google Ads. You may utilize a show more/show less button underneath an embedded video if preferable to hide the text.
Images give users a way to visualize your mission, and can help support . Our team partners with hundreds of nonprofits and we love to see quality images that inspire people to get connected. If we are managing your Google Ads, we create the ads based on the content on your website. We sometimes find that nonprofits include text within images. This technique is not helpful for creating ads as we cannot pull text from images for the ads.
Common examples of text included in images are event flyers, banners, or product-related images. You are welcome to continue using these images, but in order to best help our Google Ad Grant team, we suggest you include this content on the webpage in addition to the image.
Provided below are a few screenshots to outline what we mean by text within images, and how to best separate them.
The yellow text highlighted in the image below is outside of the image and is able to be used for Google Ads.
The green text highlighted in the image below is within the computer mock-up image. This is not available to be used in ads. If this information was important for the ads, we would suggest it be included in the paragraph to the left.
We can advertise for almost anything, as long as the content can be found within the domains approved for your ad grant account. At a high level, more landing pages will support the usage of more keywords and ads, which will equate to more ad spend and traffic we can generate.
It is not uncommon for event, campaign, ticketing, registration, and a plethora of other alternate page content to be found in a 3rd party window such as GoFundMe, EventBrite, GiveLively, etc. These pages however are not approved for Google Ads. These pages can continue to run and be maintained as is, but in order for us to better leverage this content in Google Ads, this content also needs a dedicated landing page for the approved domain(s) in Google Ads. You can utilize call-to-action buttons on a dedicated landing page to direct users to the 3rd party processing pages.
Additional dropdown options are an excellent way to utilize more ad spend and generate more traffic, as this allows us to create more ads and use more keywords. Drop-downs are equally important for user flow, in creating a clean user experience that clearly guides users from point A to point B and your desired call-to-actions.
Adding additional dropdown options is not easy and may be better conveyed to a web developer to action if you have one available; however, included below are a number of guides for some of the more common web providers on how to add additional dropdown options.
Google Ads function best when they are directly related to the content of your website. If our team is managing your Google Ads, we love to see content-rich websites. That being said, it is possible to have too much content on a single page. Occasionally, we suggest that you divide your biggest web pages into separate pages with unique purposes. Follow the following steps to best understand this process.
1. Decide how you want to divide the page.
- Consider how the current content-rich webpage is already divided. Often, websites will have different sections or headlines that call the user to interact with the page in different ways or explain different sets of information. If there are a few distinct sections already set within this webpage, make separate pages for each of these sections with the main headline as the webpage title.
- If you do not already have sections within this page that would make it easy to divide, consider the overall purpose of the page. Is there more than one CTA (call to action)? If yes, start to brainstorm ways to separate these CTAs in a way that would be easily summed up in separate pages.
- Finally, if you cannot find a way to separate the content-rich webpage into multiple pages, consider adding additional clear CTA buttons throughout the page. This will help improve the user experience. Check out another FAQ that explores the benefits of clear CTA buttons.
2. Create new pages
Once you have a vision for your new web pages it is time to start creating them. Explore each of the links provided below that explain how to create new pages on common website providers.
Making a website fast for users is key to having them stay on the site and engage with your content. Slow loading speeds make it harder for users to interact with your site and increases the bounce rate. This can have an effect on Google Ads.
Source: Pressable
Since mobile-first indexing was introduced in 2016, Google has steadily increased the importance of site speed for ranking. Fast websites, across mobile & desktop, have a greater chance of ranking higher than slower sites with high bounce rates.
PageSpeed Insights is a free tool that Google uses to help you see how quickly your website loads for users. PageSpeed Insights' scoring is based on the metrics summarized below.
- First Contentful Paint (FCP) – time taken for the first text or image asset to load
- Largest Contentful Paint (LCP) – time taken for the largest text or image asset to load
- First Input Delay (FID) – time taken by the browser to respond to the visitor’s first interaction
- Cumulative Layout Shift (CLS) – measures any movement of the page in the viewport
- Speed Index (SI) – time taken for the content to visually appear during page loading
- Time to Interactive (TTI) – time taken for the page to become completely interactive
- Total Blocking Time (TBT) – total time of FCP and complete interactivity
Included below are a few tips to improve your mobile & desktop site speeds to better support Google Ads. These tips are best conveyed to a developer if you have one available to you. Otherwise we'd be happy to assist, and you can learn more here.
Optimizing the size and delivery of images
If your image sizes are not optimized, it will cause your pages to load slowly for users. Serving images in the proper size, format, and at the right time can significantly improve both overall page load times and the PageSpeed Score.
The best time to optimize images is before they are uploaded to the website. This means setting standards for format and maximum resolution that all the site’s users adhere to. Apart from serving images in the proper size, it’s also important to serve next-gen images such as WebP, JPEG 2000, or JPEG XR. Only load below-the-fold images when they first hit the user’s viewport (this is also known as lazy loading). Most commonly used CMS like WordPress, Drupal, Magento, etc., provide third-party extensions and plugins to convert images to next-gen formats, lazyload them, and bulk optimize them.
Reduce unused JavaScript and CSS
Shipping unused code is a common problem in web development. Let’s say you need to add a navigation bar to your site from the Bootstrap library, so you add a link to the Bootstrap stylesheet in your HTML. The stylesheet doesn’t just contain the nav bar though, it contains all of Bootstrap’s components. All that unused code contributes to page latency.
Publishers using WordPress should consider reducing the number of plugins that are adding extraneous JS/CSS code to the web pages. You can use code coverage in Chrome DevTools to identify the URL of problematic scripts or stylesheets. Watch out for theme components or plugins that have a lot of red in code coverage. Also consider minifying your JS, CSS, and HTML code—which is the process of removing syntax and extra space to compress the code to further reduce load time and bandwidth usage. You can use Autoptimize or WP Rocket to automatically minify code in WordPress. Publishers using another CMS or a custom-built website can use a third-party JavaScript Minifier and CSS Minifier to minify their code manually.
Speed Up Server Response Time
Server response time or TTFB is a measure of how long the browser is required to wait before it gets its first byte of data from the server. The longer this period is, the longer it takes for the page to load.
A low TTFB is not the same as a fast overall site speed, but a fast server response time improves site performance.
Source: WordStream
Methods to speed up server response times:
- Use a fast WordPress host – A quality WordPress-focused hosting provider has a carefully thought-out architecture and prioritizes speed.
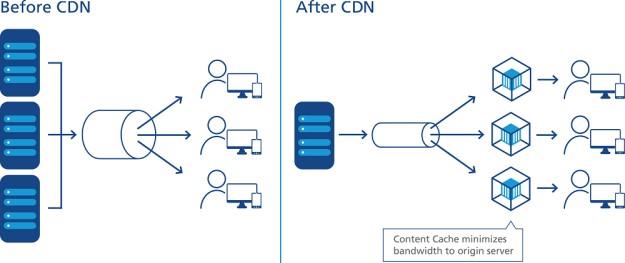
- Implement a Content Delivery Network (CDN) – If you have a website that serves visitors around the world, using a CDN will significantly lower your TTFB.
- Use WordPress caching – Caching can decrease page load times as well as TTFB because it reduces server processing time. Free caching plugins like Cache Enabler are available.
- Select a premium Domain Name System (DNS) provider – Typically, with premium DNS providers, DNS lookup times are faster. However, Cloudflare is a free DNS provider that offers excellent performance.
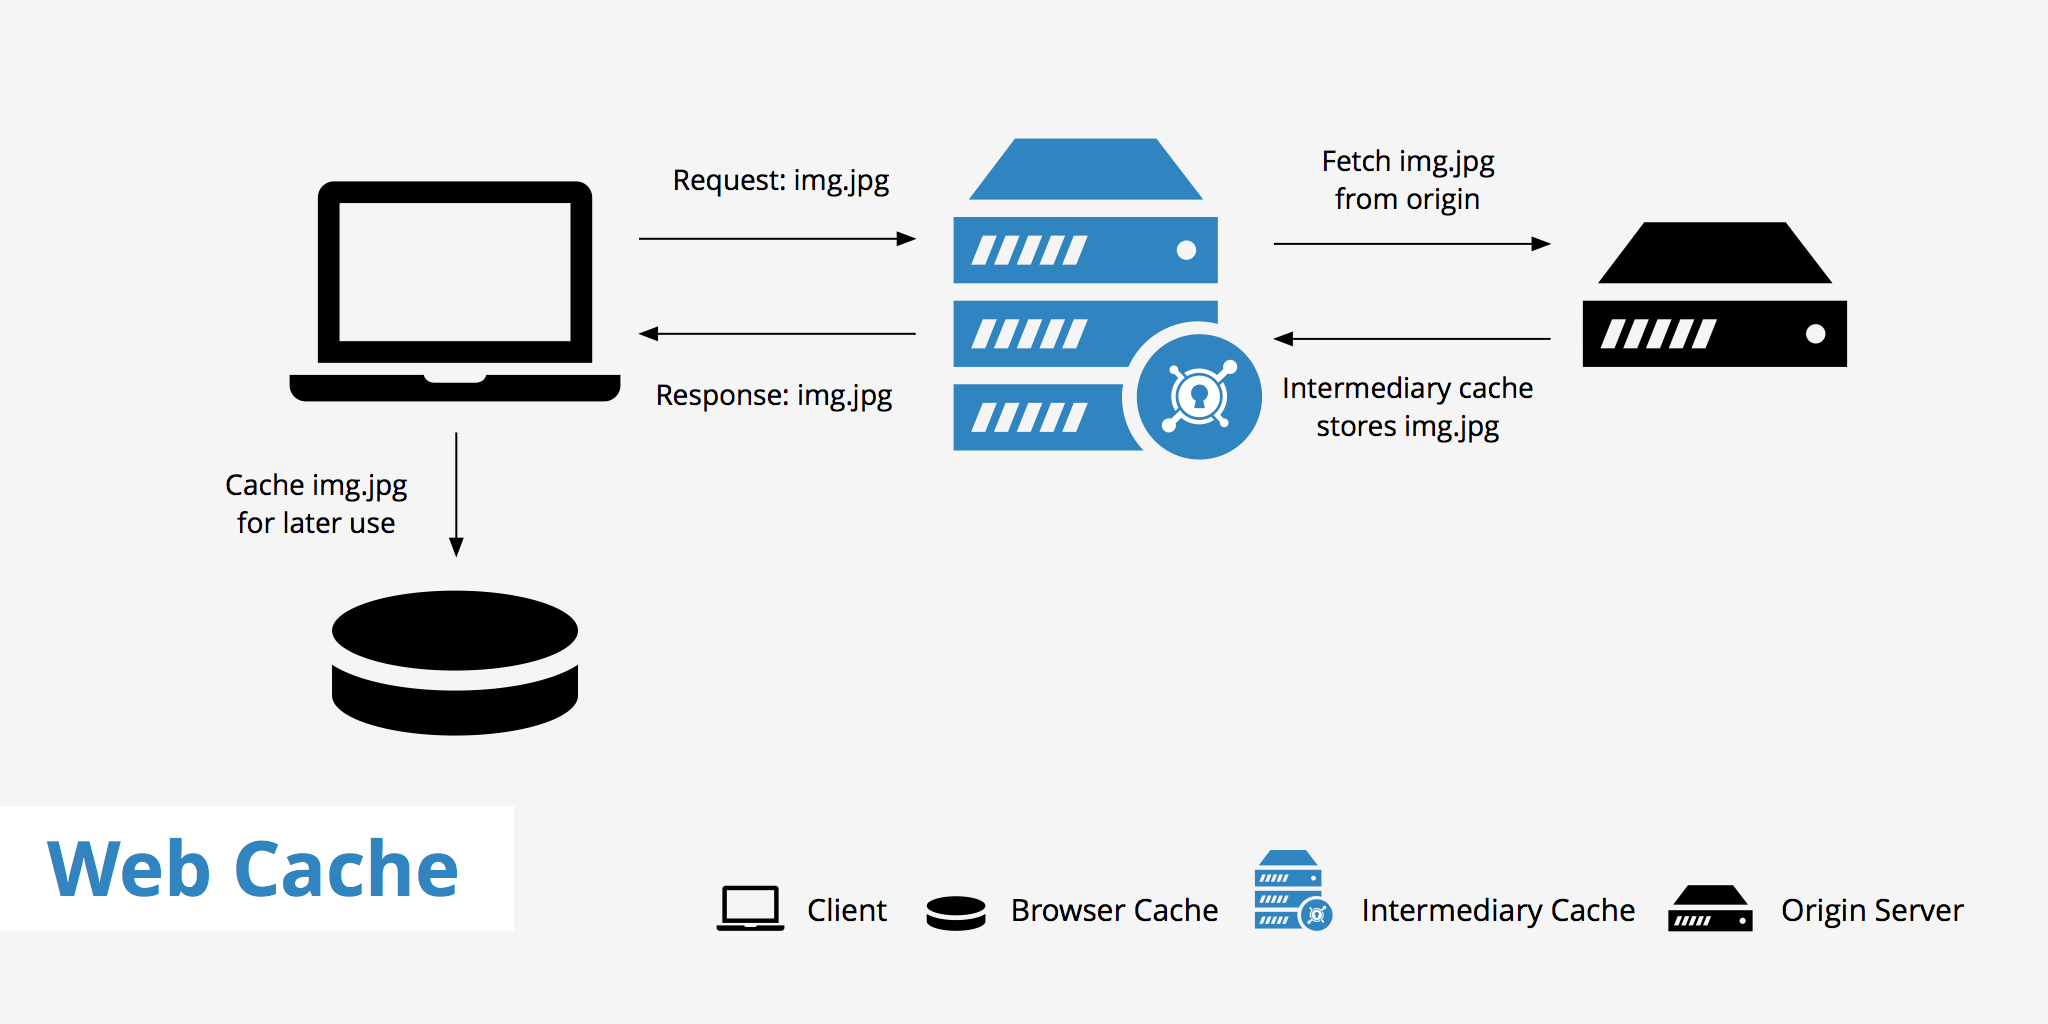
Leverage Browser Caching
Browser caching is a basic optimization that enables your webpages to load faster for repeat visitors. When the visitor moves to a new page on your site, caching ensures that all your data (like logos and fonts) does not have to be reloaded.
This results in a vast improvement in site speed.
Source: KeyCDN
Use plugins like W3 Total Cache, WP Super Cache, and WP Rocket for WordPress websites to implement browser caching.
Google PageSpeed Insights requires you to have an “efficient” cache policy. This means that you need to optimize the frequency at which your browser clears its cache. But you don’t want it to be too often because it defeats the purpose of having browser caching.
You can optimize your cache expiration period by adding Cache-Control and Expires headers to an Nginx server. If you have Apache servers, you can edit or create a .htaccess file (with the help of a web developer).
You can also consider hosting Google Analytics locally with plugins like Perfmatters and Complete Analytics Optimization Suite (CAOS).
Embed Video Content
If you have videos on your site that feature your products or services, avoid uploading them to your site. Not only do they take up a lot of space, but they can also place stress on your web server if lots of users are playing the videos at the same time. Instead, store videos somewhere else (like YouTube) and embed video content on your web page to significantly improve load times. Click here to find steps for embedding Youtube videos.
Avoid Excessive Redirects
Redirects can increase time-to-first-byte (TTFB) or the time between the request to the server and when the first data is sent back to the requester. Avoiding excessive redirect chains can help you improve page speed and is a good practice for better SEO overall.
The best way to understand the grant is that you are given ~$333 to spend on a daily basis of in-kind ads on Google. If you don’t use the full $10,000 each month, you don’t have to worry as every day it resets the amount you can spend to ~$333. The in-kind dollars help cover the costs of people who are clicking on your ads after searching terms related to your organization online. Our goal is that on a daily basis to maximize the allocated budget and spend as much of the $10,000 each month as we can, while maintaining high quality scores.
No. We do not charge per campaign. We’re happy to build any campaigns that are feasible and aligned with best practices for the Google Ad Grant. That said, we follow a set strategic process to ensure your ads have the best chance of success.
If a requested campaign is unlikely to perform well, falls outside Google’s policies, or cannot be supported by your website content, we will let you know and recommend the strongest path forward. Our goal is always to prioritize campaigns that will serve your organization effectively and make the best use of your grant.
We organize search campaigns in accordance with your navigation bar on your website. When we write NAV before a campaign name, we are simply indicating this is a group of ads running to a main landing page on the navigation bar. There are a number of unique ads that run within this campaign, especially if a navigation tab contains drop-down menu items.
We take a comprehensive approach to optimization to keep your Google Ad Grant account healthy, compliant, and performing as strongly as possible. Our ongoing work includes, but is not limited to:
Ad and Campaign Improvements
Updating and refining ad copy
Running A/B tests
Adjusting campaign settings and structure
Managing budget caps
Updating audience signals
Keyword and Search Quality Enhancements
Adding and refining negative keywords
Reviewing search terms to improve targeting
Ensuring campaigns align with what users are actively searching for
Conversion and Performance Tracking
Reviewing and revising conversions
Evaluating data in Google Ads, Google Analytics, and tools like Microsoft Clarity
Policy and Technical Maintenance
Troubleshooting limitations, low-quality statuses, and disapprovals
Ensuring the account remains compliant with Google Ad Grant policies
Our goal is to continually strengthen your account so you can make the most of the opportunities available within your search space.
Ads are displayed on Google when a Google user searches a relevant keyword. Depending on what the user searches, Google will determine if there will be ads displayed and, if so, which ads. When setting up an Ads account, PWI will select relevant keywords to be tied to each ad. These keywords need to be directly related to the content displayed on the landing page on your website that the ad is directed towards. Google chooses to display ads on a particular keyword search and will allow you to bid on the opportunity for your ad to be displayed.
Yes. Your Google Ad Grant account will function separately from your paid Google Ads account. There are pros and cons to each, however its optional to run both concurrently.
Yes. Our team is fully equipped to apply for or help reactivate your old accounts and recover suspended accounts. This process will likely take a bit longer than a typical account setup. If for some reason your account is unable to be approved or reactivated, we will refund you.
PWI does provide some website recommendations with the Google Ad Grant Management plan. We also offer website services for a fee (optional). Please advise, website recommendations normally came later in our process, as we prioritize setup and data collection first.
Google Analytics is a web service provided by Google that tracks and reports traffic to your website. Having Google Analytics is a requirement for PWI's management of the Google Ad Grant. To create a Google Analytics account, please click here.
Adding analytics to your website can be tricky and is entirely dependent on your website provider. For steps on how to add analytics to your website, please click on the respective link below. If you require assistance or don't see your web provider listed, click 'Help' below.
Google Analytics 4 (GA4) is a newer version of Analytics that launched on 10/14/2020. GA4 is now the defaulted version of Analytics for new accounts, and is supported by Google Tag Manager.
Conversions show a completed activity, online or offline, that is important to the success of your business. Examples include a completed sign-up for your email newsletter (a Goal conversion) and a purchase (a transaction, sometimes called an Ecommerce conversion). Conversions are important here and are also necessary to remain compliant with Google.
If you are partnered with PWI on our Google Ad Grant management services, we will handle conversion creation for you. We'll need Editor access to your Google Analytics account to achieve this. For steps on how to grant PWI Editor access to your Google Analytics account or in the event you are just getting started with Google Analytics, click here.
Included below are some additional resources on GA4 and Google Tag Manager, that will provide guidance on conversion creation. If you have any additional questions, click the 'Help' button below.
https://support.google.com/tagmanager/answer/9442095?hl=en
https://studiohawk.com.au/blog/google-tag-manager-goal-tracking-setup/
https://www.analyticsmania.com/post/track-conversions-with-google-analytics-4/
1. Go to analytics.google.com and sign in. In the bottom left corner of the screen there is a gear sign Titled Admin. Click on this button.
2. Once on the Admin screen, you will see these options. In the left-hand column there is an option for Account User Management (see second picture down). Click this Account User Management button.
3. Once on the Account User Management page, add nonprofit@projectworldimpact.com as an admin to your Analytics account. The standard role level should be Editor or Administrator.
Great question! You'll first need to create a Google Tag Manager (GTM) container. If you already have a container created, find the GTM code associated with the container, called the Container ID. The format is GTM-XXXXXXX. You can find the Container ID on the Account homepage or in the upper-right hand corner of your container. Depending on the provider, you may need to incorporate the full code into the <head> and <body> which can be found be clicking on your Container ID.
After your Container ID is accessible, you'll next want to explore the GTM integration plugin/instructions available to you and your web provider. It's important to note that a plugin is the easiest method for integrating your GTM code, but not all web providers have a plugin and manual code integration is an alternative option. Included below is a list of some of the common web providers who have free plugins and guides, which also contains steps for integrating your GTM code.
If your web provider is not listed, you should first conduct a quick search for a guide/plugin available to you. Search "Google Tag Manager plugin for insert web provider" to see if there are any plugins available. If there are no plugins available, search "Google Tag Manager insert web provider guide" for concise instructions. You can also utilize Google Tag Manager's Quickstart guide.
If you are partnered with PWI for Google Ad Grant management, please click on the Help button below for assistance.
We provide basic Google Analytics support as it relates directly to managing your Google Ad Grant account. This includes ensuring essential tracking is in place for grant performance.
If you need support beyond what is required for Ad Grant management, we do offer additional Analytics services, which are billed separately.
- Provide PWI with the 10 digit Customer ID# (CID#) associated with your account. This can be found in the upper-right hand corner of Google Ads, or on the product page of your Google for Nonprofits portal.
- PWI will request access to your account from our managing account. Google will send a request for access to account admins thereafter.
- Please follow the steps outlines in the email. Alternatively you can accept our request directly on Google Ads, under the 'Managing tab' found in Access and security.
This link will take you there. Please advise it may require you to sign in first.
Clicks
- When someone clicks on your ad (blue headline of a text ad), Google Ads counts that as a click.

CTR
- Click Through Ratio is a ratio showing how often people who see your ad end up clicking on it. CTR is one of the things we look at to gauge how well your keywords and ads are performing.

Impressions
- How often your ad is shown. An impression is counted each time your ad appears on a search result page or any site on the Google Network.

Conversions
- An action that's counted when someone interacts with your ad and then takes an action that you've defined as valuable to your business, such as an online purchase, donation, form-filling, and/or information requests.

Conversion Rate
- A percentage that shows the average number of conversions per ad interaction.

Cost
- Total amount of dollar you've spent of the grant over the designated time window in the Data Studio Report.

Dates
- You can select dates or even create a range to narrow the data.

Campaigns
- A set of ad groups that share a budget, location, targeting, and other settings. Top campaigns are the most successful in clicks.

Key Word Help
- A reference box on your google ad grant dashboard analytics page that breaks down the key analytic pieces to focus on. Click on any of these words to read an explanation.

f PWI is managing your Google Ad Grant, we will actively work to improve your click-through rate as part of our ongoing optimization process. There are several proven methods for strengthening CTR, including:
Adding or refining negative keywords
Revising keyword targeting
Improving or adjusting ad copy
Aligning ads more closely with landing page content
Making strategic landing page updates on your end
CTR is influenced by many factors, including search behavior and competition, but we will take all appropriate steps to help improve performance within Google’s guidelines.
Absolutely! You can target the world, countries, states, cities, zip codes, a radius and more. For new accounts, it's suggest to start with wider geo-targeting, before honing.
Disapproved ads could arise on a Google Ads ad grant account due to violating Google's Ads policy. For organizations who provide healthcare services, addiction services, drug/alcohol abuse rehabilitation, etc., this could be a regular occurrence that might not be solved in Google's appeal process. There are a number of alternative solutions PWI attempts first to fix ads with limited or no eligibility, however, these solutions don't always work. This is where LegitScript comes in.
LegitScript is a verification company that a number of search engines, e-commerce platforms, agencies, and companies use to ensure their services are legal and safe for consumers. For some ad appeals (but not all), Google will require an organization who impacts or interacts with the above services to be verified on LegitScript.
Once an organization is verified, this form will need to be submitted through Google to allow for all forms of healthcare related advertising, and will prevent disapproved ads from occurring regularly. If PWI is managing your ads under any of our ad grant management plans, we will fill out this form for you. However, your organization must first be verified or go through the verification process on LegitScript.
If you have LegitScript verification, please let us know. Otherwise here are the actionable workarounds we will attempt to remedy disapprovals:
- We go through the traditional appeal process, as some appeals will fix disapproved ads.
- After three appeals, we connect with a Google representative to determine a permanent solution.
- We will find alternatives and/or on some occasions remove keywords and descriptions that are being flagged by Google.
- We'll reach out with suggestions to reformat a specific landing page surrounding the flagged content; we could also create ads to a copy of a page that is reformatted with different verbiage rather than altering a page.
Location targeting allows your ads to appear only in the locations that you specify: eg. countries, cities, radius around a location, etc. This helps you reach your customers where they are and where your nonprofit can serve them.
Keywords are essential to a healthy and effective Google Ad Grant account. When selecting keywords, we use several methods to ensure they are relevant, policy-compliant, and aligned with your goals. Our process includes:
Landing Page Relevance
Prioritizing keywords that appear directly on your landing pages.
These typically earn higher quality scores and perform more consistently because they align closely with your content.
Google’s Keyword Planner
Using data-driven insights from Google to identify search volume, competitiveness, and related terms.
AI-Assisted Suggestions
Using AI tools to generate additional keyword ideas based on carefully crafted prompts.
All AI-generated terms are manually reviewed for accuracy, relevance, and compliance before use.
Additional SERP and Research Tools
Utilizing trusted third-party tools to evaluate search behavior and identify strong opportunities.
Our goal is always to build a keyword list that maximizes relevance, supports your objectives, and gives your campaigns the best chance to succeed within Google’s policies.
The Keyword Planner is a tool that helps you discover relevant and commonly searched keywords for your website. You can access it at https://ads.google.com/home/tools/keyword-planner/ and log in using the Google Account connected to your Google Ad Grant.
Once inside, you can search for new keyword ideas by entering your website URL or the core services you provide. The tool will show related keywords along with their search volume and other helpful metrics. We recommend selecting popular, relevant terms and incorporating them into your website content where appropriate.
PWI uses the Keyword Planner, along with additional tools, to build and optimize your Ad Grant campaigns. We ask that you do not make changes directly in your Google Ads account, as it can impact ongoing testing and performance. Using the Keyword Planner simply as a research tool is the best way to support your website and overall strategy.
There are a few different options for how to set up keywords. You can choose exact match, phrase match, or broad match. We typically suggest starting accounts with broad match keywords. This allows the ads to gather more data because the ads can be displayed when a user searches words similar to the keyword used. Below is a list that outlines the different types of keywords.
Exact Match: The ad can be displayed only if the Google user searches the specific keywords we target.
Phrase Match: The ad can be displayed if the user's search includes the meaning of the keywords we target. This is less specific than exact match but more specific than broad match.
Broad Match: The ad can be displayed if the Google user searches a word related to the meaning of the keywords we target.
Click HERE to view an article written by Google about Broad Match keywords.
Conversion tracking is a tool that helps measure what a user follows through on after visiting your website. A few common conversion metrics that are used would be donations, sign-ups, form filling, and information requests. Tracking these conversions is a great way to measure your overall success with the Google Ad Grant. Conversions are also a requirement to remain compliant with Google.
If you have any questions on conversion tracking or how to get started with conversions, click on the 'Help' button below.
You can link to an unlimited number of pages, as long as they are on your approved domain. However, because the Google Ad Grant has a fixed monthly budget, spreading your ads across too many pages can dilute performance.
Our goal is to focus on the pages that will perform well, support your objectives, and make the best use of your available ad spend. If a page is unlikely to drive meaningful results, we will advise you accordingly.
Yes, you can view your results from previous days, weeks, and months by changing your view filter on your Google Ads account homepage.
Ad assets, formerly called ad extensions, are optional add-ons that expand your ad with extra information such as call buttons, location details, or links to specific pages on your website. These additions help make your ads more useful to searchers and can improve visibility and click-through rate.
CTR means the click-through rate. The CTR percentage represents the number of people who click on your ad after they see it.
Cost per click (CPC) refers to how much your grant account will be charged each time someone clicks on your ad. This depends on the cost of the keywords associated with the ad.
The grant program places a $2.00 limit on the keywords you are allowed to bid on. This rule changes once you add conversion tracking to your website to help ensure that your ads are reaching their appropriate respective audience.
Choose words that are close to your mission, the content on your website, and the content of the ads that they correlate with. If you’ve run out of ideas for keywords, use a Keyword Planner to generate new ideas and pick the ones that are most appropriate.
They may not be relevant enough to your ad content or match the content of the web page. They must be connected to your nonprofit’s overall mission. If you have specific questions about your keywords, you can call the Google support line.
If you are having PWI manage your Grant Account, this entire process will be covered by our Grants team.
It’s very common not to see your own ads when you search for them. Google intentionally avoids showing ads to people connected to an organization as a way to prevent wasted spend. If you regularly visit your own site, it is immensely difficult to see your ad naturally.
Beyond that, whether an ad appears depends on many factors. Some are within our control, such as keyword optimization, relevance, and account structure. Others are controlled entirely by Google. For example, Google may choose to show only organic results for certain searches, even if you’re bidding on that keyword, or show ads inconsistently based on user behavior and context.
Google also uses far more data about a user than advertisers can see, which influences when and to whom ads appear.
Because of these moving parts, manually searching for your ads is not a reliable way to check performance. Instead, impressions, clicks, and search term data inside Google Ads reflect what’s actually happening.
If PWI manages your account, we are continually optimizing your campaigns to improve visibility when Google decides ads should show. We appreciate your patience as we work within Google’s systems to get your ads in front of the most relevant users.
- Broad match allows your keywords to run on search terms that are relevant variations to your keywords, even if they aren’t in your keyword lists. Broad match keywords can contribute to a lower overall CTR in some cases if they appear relevant for too many search terms.
- Phrase match lets a keyword trigger only when someone searches for your exact keyword phrase or close variations of your exact keywords. It can increase the likelihood of a click since it shows your ad only when it matches the phrase the searcher typed in.
- Exact match will only show your ad to customers who are searching for your exact keyword or close variants. It gives you the most control over who sees your ad and gets a higher CTR but may yield lower overall impressions.
You need at least one campaign to start. Each campaign requires a minimum of two ad groups. You can have an unlimited amount of campaigns, but your budget will be split between them. We recommend starting your Google Ad Grant with two campaigns.
If you are having PWI manage your Grant Account, this entire process will be covered by our Grants team.
You can adjust your campaigns whenever you want based on your goals for driving traffic, however there is such thing as "too often". We recommend beginning with one month initially in order to see which ads and keywords are effective and then adjusting them from there.
If you are having PWI manage your Grant Account, this entire process will be covered by our Grants team.
If you’re a nonprofit registered in one of Google’s selected countries and are not a governmental, healthcare, or academic institution, you are eligible to receive the Google Ad Grant!
Your organization must:
- Hold current and valid non-profit charity status (for example, in the U.S. you must have a current 501(c)(3) status).
- Acknowledge and agree to the Google Ad Grant’s certifications regarding how to receive and use donations obtained from the grant — and we can go over that with you.
- Have a website that is both functioning and provides adequate detail on your nonprofit.
You can view all the Google Grant account requirements here: https://support.google.com/nonprofits/answer/46103?hl=en.
You can browse the Google Grant Online Support Center here: https://www.google.com/grants/resources/
Your monthly budget with the grant is $10,000, which equates to ~$333/day. You can spend up to $10,000 each month.
Follow Google’s step by step process for setting up your account once you are approved for the grant.
PWI has streamlined this process, and we would love to manage your account and help with initial set-up.
Click here to visit Google for Nonprofits and sign up using your organization's website. Sometimes Google can take a couple weeks to approve your account, but if you have any questions, don't hesitate to reach out to the Google for Nonprofits Support Team.
To access the GroupGive dashboard, ensure you are logged into your PWI account. Navigate to /dashboard/groupgive in your browser. This will take you to the GroupGive dashboard where you can manage your projects and campaigns.
Before using GroupGive, ensure that your organization is active and that you have the necessary permissions. The feature is protected by auth, org.active, and feature:groupgive middleware, which means you need to be authenticated and have the GroupGive feature enabled for your organization.
To create a new category, navigate to the Categories section and click on Create. Fill out the necessary information and click Save to add the new category.
To edit a category, go to the Categories section and find the category you wish to edit. Click on Edit next to the category name, make your changes, and then click Save to update the category.
Toggling a category's active status will either activate or deactivate it. Navigate to the category and click on Toggle Active. This will change the category's status, affecting its visibility and availability for projects.
To view all your projects, go to the GroupGive dashboard and click on Projects. This will list all the projects you have created or are managing.
To update a project's status, navigate to the specific project page from the Projects list. Click on Update Status and select the desired status from the options provided. Confirm your changes to update the status.
Yes, you can contact the project owner. Go to the project page and click on Contact Owner. You can either view the contact information or send a message directly through the provided form.
To view performance reports, go to the Reports section in the GroupGive dashboard. Click on Performance to see detailed insights and metrics about your campaigns and projects.
Yes, you can export donation data. Navigate to the Export section and select Donations. Choose your export preferences and click Export to download the data.
You can generate several types of reports, including Performance, Categories, Donations, and Top Fundraisers. Access these reports from the Reports section in the dashboard.
PWI Shoutout is a visibility product that features your nonprofit on Project World Impact's social media channels. We have over 25,000 followers on Twitter/X alone! Submit your shoutout content, we review it against our community guidelines, and then promote your organization to our engaged audience.
It's simple! Submit your shoutout request through the form, including your message, social handles, and any images. Our team reviews your submission (usually within a few days), and once approved, we schedule and post it to our social media channels, tagging your organization for maximum visibility.
PWI Shoutout gives your nonprofit instant access to our established social media audience. Organizations featured through Shoutout have seen expanded volunteer networks, new funding partnerships, and significantly increased awareness for their fundraising campaigns.
You can submit shoutouts as often as you like! However, we typically space out posts for each organization to ensure a variety of nonprofits are featured. We recommend submitting at least 2-3 weeks before any time-sensitive events or awareness days.
To create a new shoutout submission, follow these steps:
- Navigate to the Shoutout section in your dashboard.
- Click on Create New Shoutout.
- Fill out the form with your message, social handles, and upload any images or videos.
- Review your submission and click Submit.
To view your submitted shoutouts, go to the Shoutout section in your dashboard and click on Submissions. Here, you can see a list of all your submissions, their status, and details.
After you submit a shoutout, our team will review it to ensure it meets our community guidelines. This process usually takes a few days. Once approved, we will schedule your post and notify you of the expected publication date.
Keep your message engaging and action-oriented! Highlight what makes your organization unique, mention any upcoming events or campaigns, and include a clear call-to-action. Messages should be concise (under 280 characters works best for Twitter) but compelling.
We support three types of posts:
- General Posts (anytime updates about your organization)
- Awareness Day posts (tied to specific awareness days like World AIDS Day)
- Awareness Month posts (for monthly campaigns like Breast Cancer Awareness Month)
If your shoutout submission was rejected, it may not have met our community guidelines. Ensure your content is appropriate, relevant, and follows our submission criteria. You can revise and resubmit your shoutout for review.
If you need assistance with the Shoutout feature, you can contact our support team by clicking on Help in your dashboard and selecting Contact Support. Provide details about your issue for faster resolution.
To start an AI content plan, navigate to the AI section in the Soapbox dashboard and click on Start. Follow the prompts to set up your content plan.
- Go to the AI section and click on Generate.
- Provide the necessary inputs and preferences for your content.
- Review the generated content and make any necessary adjustments.
- Navigate to the AI section and find your plan under Review.
- Click on the plan to see the details and content.
- Make any updates to the posts as needed and save your changes.
To access the Soapbox dashboard, navigate to the /dashboard/soapbox URL after logging into your PWI account. Ensure you have the necessary permissions and that the Soapbox feature is active for your organization.
Before using Soapbox, make sure you have connected your social media accounts under the Platforms section. This will allow you to schedule and publish posts directly from the dashboard.
- Go to the Taglists section in the Soapbox dashboard.
- Click on Create to start a new list.
- Add your desired hashtags to the list.
- Click Save to store the list for future use.
- Navigate to the Taglists section.
- Select the list you want to update and click on Edit.
- Make the necessary changes to the hashtags.
- Click Update to save your changes.
- In the Taglists section, find the list you want to delete.
- Click on Delete next to the list.
- Confirm the deletion when prompted.
- Go to the Posts section in the Soapbox dashboard.
- Click on Create to start a new post.
- Fill in the required details such as content, images, and hashtags.
- Click Save to store the post or Publish Now to immediately publish it.
- Navigate to the Posts section.
- Find the post you want to edit and click on Edit.
- Make the necessary changes to the content or settings.
- Click Update to save your changes.
When you click Publish Now on a post, it will be immediately sent to the connected social media platforms. Ensure that all content and settings are correct before publishing.
- Go to the Platforms section in the Soapbox dashboard.
- Click on Connect next to the platform you want to add.
- Follow the on-screen instructions to authorize and connect your account.
- In the Platforms section, locate the account you wish to disconnect.
- Click on Disconnect next to the account.
- Confirm the disconnection when prompted.
- Navigate to the Platforms section.
- Find the page you want to toggle and click on the Toggle button.
- The page will be enabled or disabled based on its current status.
To export submission data, navigate to the Submissions section and click on Export. Choose the format you wish to export the data in and follow the prompts to download the file.
Yes, you can generate a report of all topics and questions by going to the Reports section in the Storyteller dashboard. Select the type of report you need and follow the instructions to generate and download it.
To access the Storyteller dashboard, log in to your PWI account and navigate to the Dashboard. From there, select Storyteller from the menu. This will take you to the main Storyteller page where you can manage your topics, submissions, and more.
The Storyteller feature is designed to help nonprofits create and share impactful stories, testimonials, and videos. It allows you to organize content by topic, manage submissions, and engage with your audience effectively.
To view submissions, go to the Submissions section in the Storyteller dashboard. Here, you can see a list of all submissions and click on any submission to view its details.
To approve or deny a submission, navigate to the Submissions section, click on the submission you want to review, and then choose either Approve or Deny to process the submission accordingly.
Toggling a submission as favorite marks it for easy access and highlights it as a preferred piece of content. To do this, go to the Submissions section, select the submission, and click Toggle Favorite.
To add questions to a topic, navigate to the Topics section and select the topic you want to add questions to. Click on Create Question, enter the question details, and click Save to add it under the selected topic.
Yes, you can edit questions within a topic. Go to the Questions section under the specific topic, find the question you want to edit, and click Edit. Make your changes and click Update to save them.
To reorder questions within a topic, navigate to the Questions section under the desired topic. Click on Reorder, drag and drop the questions into the preferred order, and click Save to confirm the new order.
To create a new topic, go to the Topics section in the Storyteller dashboard. Click on Create Topic, fill out the necessary information such as the topic name and description, and then click Save to add the new topic to your list.
Yes, you can edit an existing topic. Navigate to the Topics section, find the topic you want to edit, and click on Edit. Make the necessary changes and click Update to save your changes.
To reorder topics, go to the Topics section and click on Reorder. Drag and drop the topics into your desired order and click Save to update the order.
- In the Text2Give dashboard, click on Codes.
- Find the code for which you want to view analytics.
- Click on Analytics next to the code.
- Review the analytics data provided, including donation amounts and donor engagement.
- Usage Reports: Provides data on how often Text2Give codes are used.
- Donations Reports: Shows detailed information about donations received through Text2Give.
To access the Text2Give dashboard, log into your PWI account and navigate to the Dashboard. From there, select Text2Give from the menu. This will take you to the main Text2Give dashboard where you can manage your campaigns.
- Navigate to the Text2Give dashboard.
- Click on Codes in the sidebar menu.
- Select Create to open the new code creation form.
- Fill in the required fields such as Keyword and Donation Amount.
- Click Save to create the new code.
The default phone number for Text2Give can be viewed in the FAQ section of the Text2Give dashboard. This number is used by donors to send their text donations.
- Go to the Text2Give dashboard and click on Codes.
- Find the code you want to edit and click Edit.
- Update the necessary fields such as Keyword or Donation Amount.
- Click Save to apply the changes.
- Navigate to the Codes section in the Text2Give dashboard.
- Locate the code you wish to delete.
- Click the Delete button next to the code.
- Confirm the deletion when prompted to remove the code permanently.
You can find the FAQs by navigating to the Text2Give dashboard and clicking on FAQ in the menu. This section provides answers to common questions about the Text2Give feature.
- Navigate to the Reports section by clicking on /reports.
- Select Donor Summary from the list of available reports.
- Specify the date range and any other criteria for your report.
- Click Generate to view the report.
To access the CRM dashboard, navigate to the /dashboard/crm URL in your browser. Ensure you are logged in and have the necessary permissions to view the CRM features.
On the CRM dashboard, you can manage contacts, view donation history, add notes, and segment your supporters. You can also access import and export functions, manage duplicates, and generate reports.
- Navigate to the Import section by clicking on /import.
- Download the Import Template to format your data correctly.
- Upload your completed template by clicking Upload.
- Map the fields from your file to the CRM fields and click Process to complete the import.
- Go to the Export section by clicking on /export.
- Select the criteria for the contacts you wish to export.
- Click Export to download the contact data in your preferred format.
- Go to the Contacts section by clicking on /contacts.
- Click on Create New Contact.
- Fill in the required fields in the contact form.
- Click Save to add the new contact to your CRM.
- Navigate to the Contacts section.
- Find the contact you wish to edit and click on their name to view their profile.
- Click on Edit to modify the contact's information.
- Make the necessary changes and click Save to update the contact details.
- Go to the Contacts section.
- Select the contacts you wish to delete by checking the boxes next to their names.
- Click on Bulk Delete and confirm the deletion.
To find duplicate contacts, navigate to the Duplicates section by clicking on /duplicates. The system will display potential duplicates for you to review.
- Go to the contact's profile and click on Find Duplicates.
- Review the suggested duplicates and select the ones you wish to merge.
- Click Merge to combine the selected contacts into a single profile.
- Confirm the merge to finalize the process.
Yes, you can undo a contact merge. Navigate to the Merge History section and find the merge you wish to undo. Click Undo next to the merge entry to revert the changes.
To create a new campaign, go to the Campaigns section and click on Create Campaign. Enter the campaign details and click Submit to add the new campaign.
To edit a campaign, navigate to the Campaigns section, find the campaign you want to edit, and click on Edit. Make your changes and click Save to update the campaign.
To update the status of a campaign, go to the Campaigns section, locate the campaign, and click on Update Status. Choose the new status and confirm the change.
Yes, you can delete a campaign. Navigate to the Campaigns section, find the campaign you wish to delete, and click on Delete. Confirm the deletion to remove the campaign permanently.
To view all pledges, navigate to the Pledges section in your dashboard. Click on Pledges in the main menu, and you will be directed to a list of all current pledges.
To create a new pledge, go to the Pledges section and click on Create Pledge. Fill in the necessary details in the form provided and click Submit to save the new pledge.
To edit a pledge, navigate to the Pledges section and find the pledge you wish to edit. Click on the Edit button next to the pledge, make the necessary changes, and then click Save to update the pledge.
Yes, you can delete a pledge. Go to the Pledges section, locate the pledge you want to delete, and click on the Delete button. Confirm the deletion when prompted to permanently remove the pledge.
To record a payment, navigate to the specific pledge and click on Record Payment. Enter the payment details in the form and click Submit to record the payment.
To set up a recurring gift, go to the Recurring Gifts section and click on Create Recurring Gift. Fill out the schedule details and click Submit to create the recurring gift.
To pause a recurring gift, navigate to the Recurring Gifts section, find the gift you want to pause, and click on Pause. Confirm the action to pause the recurring gift.
To resume a paused recurring gift, go to the Recurring Gifts section, locate the paused gift, and click on Resume. Confirm the action to restart the recurring gift schedule.
Yes, you can cancel a recurring gift. Navigate to the Recurring Gifts section, find the gift you wish to cancel, and click on Cancel. Confirm the cancellation to stop the recurring gift.
To generate a pledge report, navigate to the Reports section and select Pledge Report. Choose the criteria for your report and click Generate to view the report.
To access the PWI Swipe dashboard, log in to your PWI account and navigate to the Swipe section. From there, you can view your organization's dashboard by selecting the Dashboard option.
To activate PWI Swipe, ensure your organization has connected a Stripe account. Without a connected Stripe account, you will not be able to activate the Swipe feature. You can connect your Stripe account in the Stripe Connect section under Settings.
To update your Swipe settings, navigate to the Settings section under the Swipe feature. Make your desired changes to fields such as Minimum Monthly Charge, Public Slug, or Welcome Message. Once done, click Save to apply the changes.
Yes, you can customize the appearance of your Swipe page. In the Settings section, you can update the Custom Color using a hex code and set a Hero Image URL to personalize your page's appearance.
If you attempt to activate Swipe without a connected Stripe account, you will receive an error message stating that you must connect your Stripe account before activating PWI Swipe. Ensure your Stripe account is connected in the Stripe Connect section.
To access billing reports, navigate to the Reports section and select Billing. Here you can view detailed billing information and export reports for specific billing periods.
The Billing Projections report provides an estimate of the current month's financial performance based on existing supporter data and transactions. Access this report in the Reports section under Projections.
To connect your Stripe account, go to the Stripe Connect section under Settings. Click on Onboard to start the connection process. Follow the prompts to authorize and link your Stripe account with PWI Swipe.
You can check the connection status of your Stripe account by navigating to the Stripe Connect section and selecting Status. This will display the current connection status of your Stripe account with PWI Swipe.
If you need to disconnect your Stripe account, go to the Stripe Connect section and click on Disconnect. Confirm the disconnection to unlink your Stripe account from PWI Swipe.
To view details of a specific supporter, navigate to the Supporters section. Click on the supporter's name to access their detailed profile, which includes linked accounts and transaction history.
Yes, you can pause or resume a supporter's account. In the Supporters section, select the supporter you wish to manage. Use the Pause or Resume options to change their account status as needed.
To export supporter data, go to the Supporters section and click on Export. This will generate a file containing the supporter data for your records.